Looking for the best Easter nests recipe? These no-bake chocolate Easter treats are a kid-friendly, quick, and delicious dessert that’s perfect for spring celebrations!
With just six simple ingredients, this no-bake chocolate Easter dessert is ready in under 30 minutes—perfect for making Easter treats with kids or prepping ahead for an Easter party.
Let’s dive into the easiest, most delicious Chocolate Easter Nests recipe!
Why You’ll Love This Chocolate Easter Nests Recipe
Super Quick & Easy – Takes just 10 minutes of prep!
No-Bake Dessert – No oven required, making it kid-friendly.
Perfect for Easter Parties – A festive, fun, and delicious treat!
Customizable Recipe – Works with cornflakes, shredded wheat, or Rice Krispies.
Great for Gifting – Package in decorative bags as homemade Easter treats!
Pro Tip: These mini egg nests can be personalized with different toppings, making them a fun DIY Easter dessert idea!
Ingredients for Easter Nests
To make 15 chocolate Easter nests, gather these simple pantry ingredients:
Main Ingredients:
- 200g milk chocolate (or use half milk & half dark for a richer taste)
- 100g shredded wheat (or substitute with cornflakes or Rice Krispies)
- 100g unsalted butter (adds a smooth texture & prevents hardening)
- 100g golden syrup (binds the nests & adds a hint of sweetness)
Toppings:
- Mini chocolate eggs (Cadbury Mini Eggs work best!)
- White chocolate drizzle (optional, for added decoration)
Substitutions & Variations:
- Gluten-Free Option – Use gluten-free cornflakes instead of shredded wheat.
- Vegan Version – Swap out dairy-based chocolate and butter for vegan-friendly alternatives.
- Extra Flavor? Add peanut butter, Nutella, or chopped nuts for a tasty twist!

How to Make Easter Nests – Step by Step
Step1: Melt the Chocolate
- Break the milk chocolate into small pieces and place it in a heatproof bowl.
- Melt using a double boiler or microwave in 20-second bursts, stirring in between.
Step2: Mix with Cereal
- Crush the shredded wheat into small flakes in a bowl.
- Pour the melted chocolate mixture over the shredded wheat and stir until fully coated.
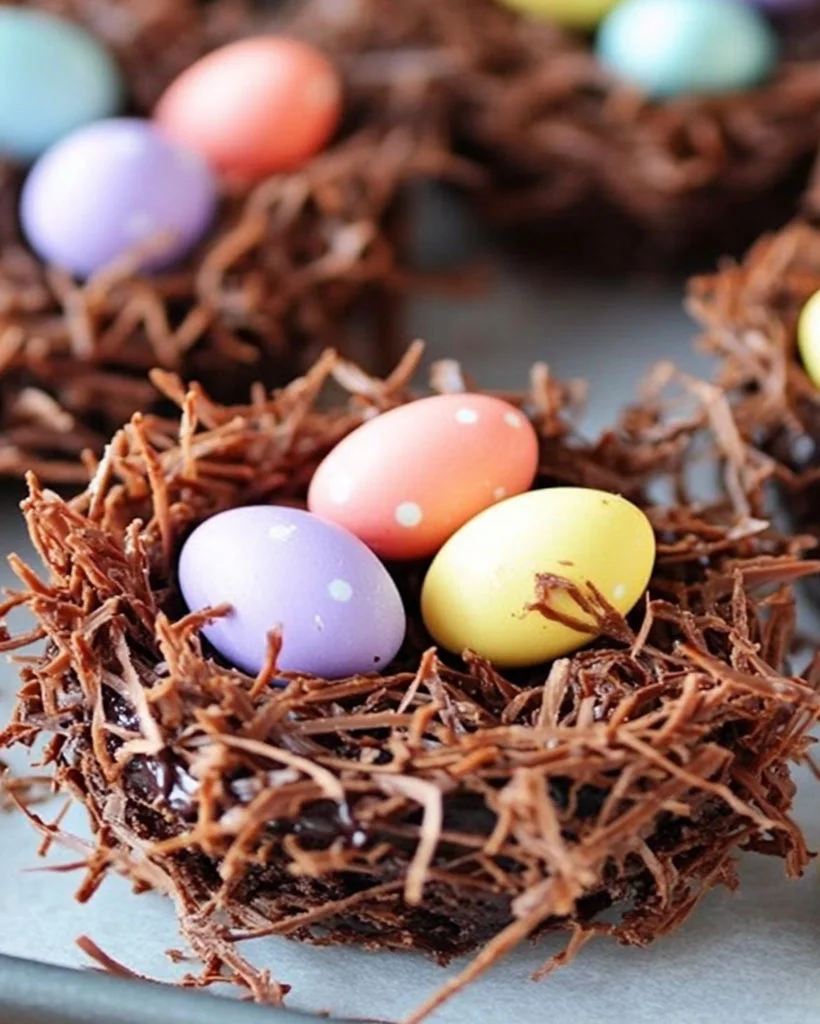
Step3: Shape the Nests
- Use a spoon or cookie scoop to shape the chocolate mixture into nests on a parchment-lined tray.
- Press the center slightly to create a well for the chocolate eggs.
Step4: Add Mini Eggs & Chill
- Place three mini eggs in each nest.
- Refrigerate for 30 minutes until firm.
Pro Tip: If you want a chewier texture, add a tablespoon of honey or maple syrup!
Expert Tips for the Best Chocolate Easter Nests
Use high-quality chocolate – It melts better and gives a smooth, rich flavor.
Don’t overheat the chocolate – It can turn grainy if overheated.
Try different toppings – Add chopped nuts, coconut flakes, or edible glitter for extra decoration.
How to Serve Chocolate Easter Nests
Pair With: A warm cup of hot chocolate or Easter brunch favorites.
Gift Idea: Package in Easter-themed gift bags for a homemade treat!
For Social Media: Drizzle with white chocolate & sprinkle with pastel-colored sprinkles for a festive touch!
Storage & Freezing Tips for Easter Nests
Room Temperature Storage: Store in an airtight container for up to 1 week.
Refrigeration: Keeps fresh for up to 2 weeks when stored in the fridge.
Freezing Instructions: Store in a freezer-safe container for up to 3 months.
To thaw: Leave at room temperature for 15-20 minutes before eating.
Frequently Asked Questions (FAQs)
1. Can I make Easter Nests without golden syrup?
Yes! Swap with honey, maple syrup, or corn syrup for a similar effect.
2. Can I use white chocolate instead of milk/dark chocolate?
White chocolate doesn’t mix well with syrup & butter, so use it as a topping instead.
3. How do I make Easter Nests without cereal?
Try using crushed pretzels, granola, or shredded coconut instead!
4. Can kids make this recipe?
Absolutely! This is one of the best Easter baking ideas for kids, as it’s fun, simple, and no-bake!
More Easy Dessert Recipes You’ll Love
Love this recipe? Try these delicious treats:
-
Chocolate Candy Brownie Pizza – Best Dessert Recipe
-
Chicken Alfredo Air Fryer Calzones – Best Dinner Recipe
Final Thoughts on Easter Nests
This no-bake chocolate Easter nests recipe is an easy, delicious, and festive treat that’s perfect for springtime. Whether you’re making them for an Easter celebration, a spring bake sale, or just for fun, these mini egg nests are guaranteed to be a hit!
Did you try this recipe? Leave a comment & review below!
Print
Chocolate Easter Nests – Easy No-Bake Dessert Idea
Description
Looking for the best Easter nests recipe? These no-bake chocolate Easter treats are a kid-friendly, quick, and delicious dessert that’s perfect for spring celebrations!
With just six simple ingredients, this no-bake chocolate Easter dessert is ready in under 30 minutes—perfect for making Easter treats with kids or prepping ahead for an Easter party.
Let’s dive into the easiest, most delicious Chocolate Easter Nests recipe!
Ingredients
Main Ingredients:
- 200g of milk chocolate (or a mixture of milk and dark chocolate)
- 100g of shredded wheat (or replace with cornflakes or Rice Krispies)
- 100g of unsalted butter (for smooth texture)
- 100g golden syrup (for extra sweetness)
Toppings:
- Mini eggs made of chocolate (Cadbury Mini Eggs are great!)
- White Chocolate Drizzle (optional to decorate)
Ingredient Substitutions:
- Vegan? Make use of the dairy-free option for chocolat or dairy-free butter that is vegan.
- Gluten-Free? Switch shredded wheat for Gluten-free Cornflakes.
- More crunch? Add chopped coconut flakes or nuts.
Instructions
Step 1: Melt the Chocolate
- Cut into pieces the Milk Chocolate into pieces, then place in an temperature-proof bowl.
- Melt the chocolate in the double boiler or microwave it in 20 second intervals mixing until the chocolate is smooth.
Step 2 Combine with Cereal
- The wheat shredded should be crushed into pieces that are small enough to place in the bowl.
- Pour the chocolate mixture that has been melted over the smashed wheat, stirring until completely coated.
Step 3: Shape the Nests
- Make use of the spoon, or a cookie scoop to divide the mix onto a tray lined with.
- Make each part into an form of a nest with a slight indentation in the middle.
Step 4: Add the Mini Eggs & Chill
- Put three chocolate eggs in the middle of each nest.
- Refrigerate for 30 minutes until firm.
Equipment
2Pcs Heart Shape Cake Pans, Aluminum Heart Cake Mold, Reusable 10 inch
Buy Now →Notes
Make sure to use high-quality chocolate. It improves the flavor and texture. Do not overheat the chocolate as it can become grainy when heated. Try different toppings – Try crushed Oreos, marshmallows or sprinkles for an exciting variation!